
Similar to previous releases, Windows Server 2019/2022 system drives frequently run out of allocated space over time. When the primary system volume runs low on storage, server performance decreases significantly. Furthermore, the operating system might hang or restart unexpectedly if the disk becomes completely congested. This article explains how to fix the C drive full issue in Windows Server 2019/2022 quickly and easily.
Symptoms of a Full C Drive in Windows Server 2019/2022
When the system partition experiences space shortages in Windows Server 2019/2022, File Explorer changes the drive capacity bar to red. This integrated visual adjustment explicitly alerts server administrators to pay attention to the critical drive capacity status.
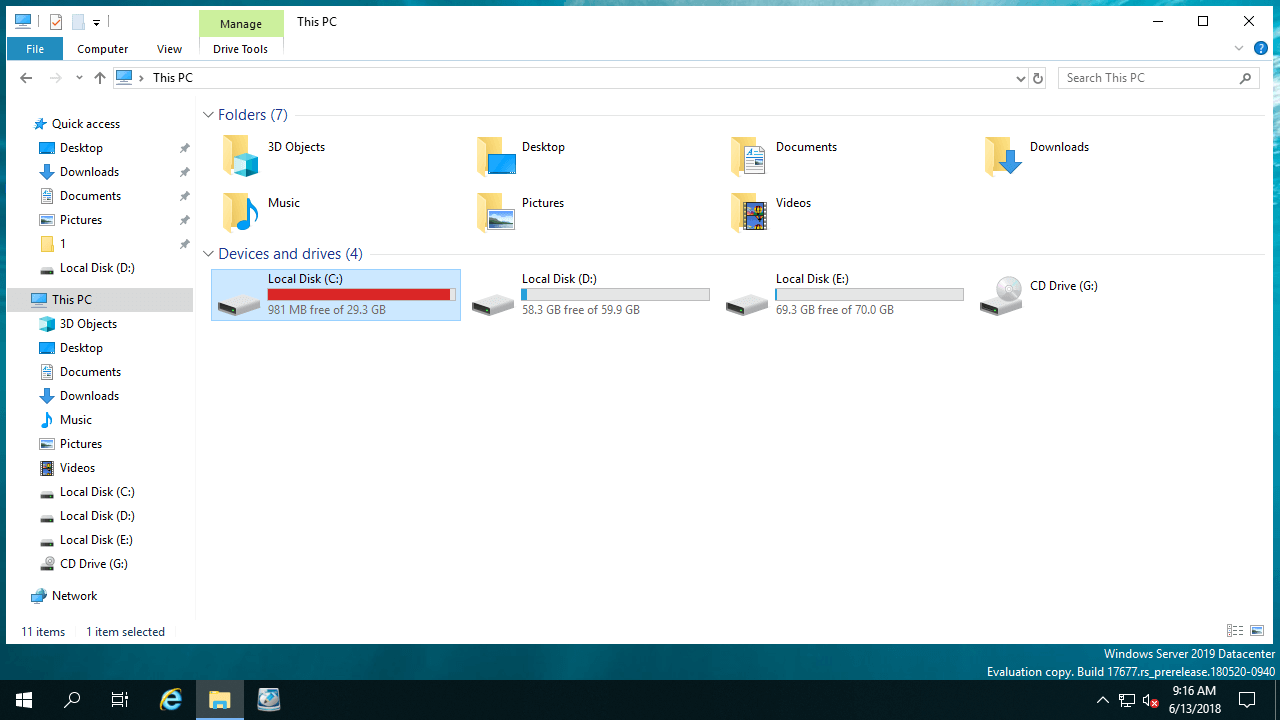
If the system drive reaches critical capacity (available capacity drops below 10%), a Low Disk Space bubble notification appears in the lower-right system tray.
Why the C Drive Is Running Out of Space in Windows Server 2019/2022
Very few administrators report that Windows calculates storage capacity incorrectly. In most cases, a full C drive is primarily caused by the accumulation of files:
- Windows generates temporary setup files continuously, including update caches, log tracking strings, thumbnails, and downloaded internet data.
- The default installation directory for server programs targets the system drive, which steadily reduces available partition space.
- Many enterprise applications automatically output log dumps and project modifications to the primary drive without configuration path overrides.
- To deploy new features and eliminate security bugs, the operating system downloads and installs large cumulative updates frequently.
- Integrated Windows backups, system restore points, and update rollbacks consume massive blocks of storage space rapidly.
What to Do When the C Drive Is Getting Full in Server 2019/2022
To completely resolve a full C drive issue in Windows Server 2019/2022, you must complete three distinct optimization steps:
- Clean up disk space - Reclaim free space by eliminating junk files to ensure the server maintains standard operational stability.
- Increase C drive space - Safely expand the volume size by reallocating free space from other partitions.
- Change server settings - Redirect active program outputs and automate temporary file purging to prevent future disk clogging.
Step 1: Clean Up Disk Space
Windows Server 2019 and 2022 include the native Disk Cleanup utility to assist administrators who need to free up disk space. This utility runs quickly and securely deletes most categories of redundant temporary clutter. Follow these instructions:
- Press the Windows key + R simultaneously on your keyboard, type cleanmgr, and press Enter.
- Select the C: drive from the selection drop-down list and click OK to initialize a system partition scan.
- Select the checkboxes next to the specific file categories you intend to purge from the system drive.
- Click OK and authorize the operation to allow the utility to clean up junk files safely.
To bypass choosing files manually during every system maintenance cycle, follow the steps to clean up junk files automatically via cleanmgr commands.
Freeing up storage space provides immediate relief, but it cannot recover substantial capacity if the system drive was initially allocated too small. To implement a sustainable long-term solution, you must add more free space to C drive blocks from alternative partitions; otherwise, it will fill up again quickly.
Step 2: Add More Free Space to C Drive
Although disk partitions are provisioned during initial setup or set by the OEM manufacturer, you can dynamically change partition size configurations without data loss.
Download NIUBI Partition Editor and follow the actions demonstrated in the technical video tutorial:
- The optimization tool works entirely within Virtual Mode initially; partition table sectors are safe from modification until you confirm by clicking "Apply."
- If your local architecture runs hardware RAID configurations, do not break active arrays or modify storage controller parameters; follow the standard video workflows.
- When an entire physical disk lacks free sectors, follow the steps to copy the drive to a larger hard drive, which allows extra capacity mapping during the migration process.
Step 3: Change Server Settings
If you can allocate a substantial block of unallocated space to the primary drive, you can skip this section. These configuration parameters are most effective for hosts running on restricted system disks.
1. Save Files to New Location
Outperforming older server releases, Windows Server 2019 allows administrators to change the default data paths for new applications, documents, pictures, and temporary data downloads.
- Right-click the Windows icon in the bottom-left corner of the screen and open the Settings console.
- Navigate to System and select Storage from the primary menu options.
- Under the "More storage settings" heading, click the link to Change where new content is saved.
- Open the drop-down menu selections to map an alternative data partition for new content blocks.
2. Change Output Path
Most server programs install to the system drive by default and dump project files there automatically. Video processing applications, project rendering software, and SQL databases produce massive data streams over time, making it essential to manually redirect application output paths to alternative storage volumes.
3. Turn on Storage Sense
Storage Sense is an integrated system optimization utility designed to free up disk space automatically when disk space reaches critical levels in Windows Server 2019. It routinely purges temporary setup files, clears the Recycle Bin, and eliminates legacy downloads. To activate Storage Sense:
- Open the central Settings panel.
- Navigate to System and select Storage.
- Toggle the control switch from Off to On beneath the Storage Sense heading on the right side of the layout screen.
To manage server disk partitions safely and efficiently, a reliable server partition manager is highly recommended.
 © 2009 - NIUBI Technology All Rights Reserved. |